Web認証の構成例と設定例
Web認証の構成例と設定例を示します。
Web認証の設定例
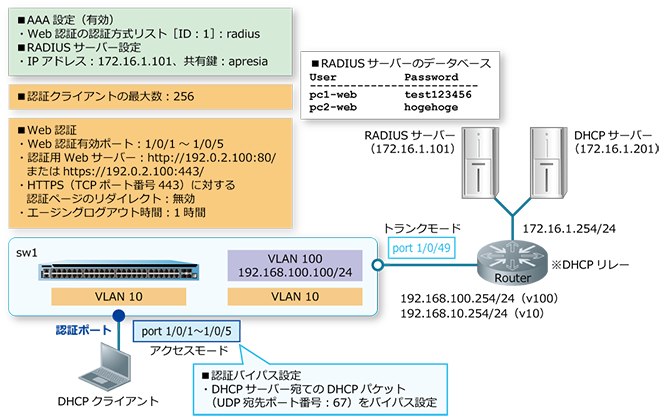
Web認証の構成例と設定例を示します。この例では以下のように設定しています。
| 項目 | 設定 |
|---|---|
| RADIUS認証 | デフォルトのRADIUSサーバーグループ「radius」で使用 |
| RADIUSサーバー |
|
| 認証クライアントの最大数 | 256 |
| Web認証有効ポート | ポート1/0/1からポート1/0/5 |
| 認証用Webサーバー |
http://192.0.2.100:80/、またはhttps://192.0.2.100:443/ ※HTTPプロトコル(80)とHTTPSプロトコル(443)はデフォルト有効 |
| HTTPS(TCPポート番号443)に対する認証ページのリダイレクト | 無効 |
| エージングログアウト時間 | 1時間 |
また、未認証クライアントが認証前にDHCPでIPアドレスを取得できるように、「DHCPサーバー宛てのDHCPパケット(UDP宛先ポート番号:67)をバイパス」する認証バイパスを設定しています。
Web認証の構成例

- VLAN 10、VLAN 100を作成し、構成例のようにVLANを割り当てます。
sw1# configure terminal
sw1(config)# vlan 10,100
sw1(config-vlan)# exit
sw1(config)#
sw1(config)# interface range port 1/0/1-5
sw1(config-if-port-range)# switchport mode access
sw1(config-if-port-range)# switchport access vlan 10
sw1(config-if-port-range)# exit
sw1(config)#
sw1(config)# interface port 1/0/49
sw1(config-if-port)# switchport mode trunk
sw1(config-if-port)# switchport trunk allowed vlan 10,100
sw1(config-if-port)# exit
sw1(config)#
- VLAN 100インターフェースに管理用IPアドレス[192.168.100.100/24]を設定します。また、本設定例ではデフォルトスタティックルートを[192.168.100.254]宛てに設定して、経路を解決しています。
sw1(config)# interface vlan 100
sw1(config-if-vlan)# ip address 192.168.100.100/24
sw1(config-if-vlan)# exit
sw1(config)# ip route 0.0.0.0/0 192.168.100.254
sw1(config)#
- 装置のAAAを有効化します。また、Web認証で使用する認証方式リスト[ID:1]を、デフォルトのRADIUSサーバーグループ「radius」に指定します。
sw1(config)# aaa new-model
sw1(config)# aaa authentication web-auth 1 default group radius
sw1(config)#
- RADIUSサーバーを、IPアドレス[172.16.1.101]、共有鍵[apresia]で設定します。設定したRADIUSサーバーは、所属するRADIUSグループを指定しない場合はデフォルトのRADIUSサーバーグループ「radius」に所属します。
sw1(config)# radius-server host 172.16.1.101 key apresia
sw1(config)#
- AccessDefender設定モードに遷移し、認証クライアントの最大数を[256]に設定します。
sw1(config)# access-defender
sw1(config-a-def)# total-client 256
sw1(config-a-def)#
- ポート1/0/1からポート1/0/5でWeb認証を有効に、認証用WebサーバーのIPアドレスを[192.0.2.100]に設定します。装置の認証用Webサーバーでは、HTTPプロトコル(TCPポート番号80)とHTTPSプロトコル(TCPポート番号443)はデフォルト有効になっています。また、エージングログアウト時間を[1時間]に設定します。
sw1(config-a-def)# authentication interface port 1/0/1-5 web
sw1(config-a-def)# web-authentication http-ip ipv4 192.0.2.100
sw1(config-a-def)# logout aging-time 0 0 1 web
sw1(config-a-def)#
- HTTPS(TCPポート番号443)に対する認証ページのリダイレクトを無効にします。
sw1(config-a-def)# web-authentication redirect disable https
sw1(config-a-def)# exit
sw1(config)#
- Web認証を有効にします。
sw1(config)# web-authentication enable
sw1(config)#
- 認証バイパス設定のために、拡張IPアクセスリスト[IPv4-EX-ACL]を作成し、以下のルールを設定します。
ルール10(authentication-bypass):宛先UDPポート番号[67]
sw1(config)# ip access-list extended IPv4-EX-ACL
sw1(config-ip-ext-acl)# 10 permit authentication-bypass udp any any eq 67
sw1(config-ip-ext-acl)# exit
sw1(config)#
- 設定したアクセスリストを認証ポート(ポート1/0/1からポート1/0/5)に適用します。
sw1(config)# interface range port 1/0/1-5
sw1(config-if-port-range)# ip access-group IPv4-EX-ACL in

The remaining applicable IP related access entries are 255
sw1(config-if-port-range)# end
sw1#
- 実施後のAccessDefender関連の設定を以下に抜粋します。
# AAA

aaa new-model
radius-server host 172.16.1.101 key apresia
aaa authentication web-auth 1 default group radius

# ACCESS-DEFENDER

access-defender
 total-client 256
 logout aging-time 0 0 1 web

# WEB-AUTHENTICATION

access-defender
 authentication interface port 1/0/1-1/0/5 web
 web-authentication http-ip ipv4 192.0.2.100
 web-authentication redirect disable https
web-authentication enable
- 実施後のアクセスリスト関連の設定を以下に抜粋します。
# ACL

ip access-list extended IPv4-EX-ACL 3999
 10 permit authentication-bypass udp any any eq bootps
interface port 1/0/1
 ip access-group IPv4-EX-ACL in
interface port 1/0/2
 ip access-group IPv4-EX-ACL in
interface port 1/0/3
 ip access-group IPv4-EX-ACL in
interface port 1/0/4
 ip access-group IPv4-EX-ACL in
interface port 1/0/5
 ip access-group IPv4-EX-ACL in
Web認証でダイナミックVLANを使用する場合
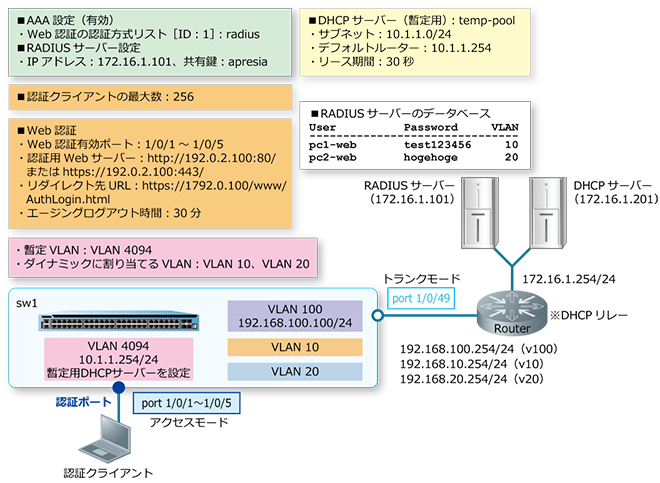
Web認証でダイナミックVLANを使用する場合の構成例と設定例を示します。この例では、認証ポートには暫定VLAN 4094を割り当てておき、ダイナミックVLANを使用して、ユーザーごとにVLAN 10またはVLAN 20が割り当てられるようにしています。
| 項目 | 設定 |
|---|---|
| RADIUS認証 | デフォルトのRADIUSサーバーグループ「radius」で使用 |
| RADIUSサーバー |
|
| 認証クライアントの最大数 | 256 |
| Web認証有効ポート | ポート1/0/1からポート1/0/5 |
| 認証用Webサーバー |
http://192.0.2.100:80/、またはhttps://192.0.2.100:443/ ※HTTPプロトコル(80)とHTTPSプロトコル(443)はデフォルト有効 |
| リダイレクト先URL | (自装置の認証ページ)https://192.0.2.100:443/www/AuthLogin.html |
| エージングログアウト時間 | 1時間 |
また、暫定VLANで未認証クライアントにIPアドレスを割り当てるための暫定DHCPサーバーは、この例では自装置に設定しています。
Web認証でダイナミックVLANを使用する場合の構成例

- VLAN 10、VLAN 20、VLAN 100、VLAN 4094を作成し、構成例のようにVLANを割り当てます。
sw1# configure terminal
sw1(config)# vlan 10,20,100,4094
sw1(config-vlan)# exit
sw1(config)#
sw1(config)# interface range port 1/0/1-5
sw1(config-if-port-range)# switchport mode access
sw1(config-if-port-range)# switchport access vlan 4094
sw1(config-if-port-range)# exit
sw1(config)#
sw1(config)# interface port 1/0/49
sw1(config-if-port)# switchport mode trunk
sw1(config-if-port)# switchport trunk allowed vlan 10,20,100
sw1(config-if-port)# exit
sw1(config)#
- VLAN 100インターフェースに管理用IPアドレス[192.168.100.100/24]を設定します。また、本設定例ではデフォルトスタティックルートを[192.168.100.254]宛てに設定して、経路を解決しています。
sw1(config)# interface vlan 100
sw1(config-if-vlan)# ip address 192.168.100.100/24
sw1(config-if-vlan)# exit
sw1(config)# ip route 0.0.0.0/0 192.168.100.254
sw1(config)#
- 装置のAAAを有効化します。また、Web認証で使用する認証方式リスト[ID:1]を、デフォルトのRADIUSサーバーグループ「radius」に指定します。
sw1(config)# aaa new-model
sw1(config)# aaa authentication web-auth 1 default group radius
sw1(config)#
- RADIUSサーバーを、IPアドレス[172.16.1.101]、共有鍵[apresia]で設定します。設定したRADIUSサーバーは、所属するRADIUSグループを指定しない場合はデフォルトのRADIUSサーバーグループ「radius」に所属します。
sw1(config)# radius-server host 172.16.1.101 key apresia
sw1(config)#
- AccessDefender設定モードに遷移し、認証クライアントの最大数を[256]に設定します。
sw1(config)# access-defender
sw1(config-a-def)# total-client 256
sw1(config-a-def)#
- ポート1/0/1からポート1/0/5でWeb認証を有効に、認証用WebサーバーのIPアドレスを[192.0.2.100]に設定します。装置の認証用Webサーバーでは、HTTPプロトコル(TCPポート番号80)とHTTPSプロトコル(TCPポート番号443)はデフォルト有効になっています。また、エージングログアウト時間を[30分]に設定します。
sw1(config-a-def)# authentication interface port 1/0/1-5 web
sw1(config-a-def)# web-authentication http-ip ipv4 192.0.2.100
sw1(config-a-def)# logout aging-time 0 30 web
sw1(config-a-def)#
- リダイレクト先の自装置の認証ページをHTTPSに固定するために、リダイレクト先URLを[https://192.0.2.100:443/www/AuthLogin.html]に設定します。
sw1(config-a-def)# web-authentication redirect url https://192.0.2.100:443/www/AuthLogin.html
sw1(config-a-def)# end
sw1#
- Web認証が無効な状態で、自装置のWebサーバー用の証明書と秘密鍵をTFTPサーバーからダウンロードします。この例では、TFTPサーバーのIPアドレス[172.16.1.202]、証明書のファイル名[test.crt]、秘密鍵のファイル名[test.key]として実施しています。また、実施前の状態が不明な場合を想定し、access-defender erase ssl-filesコマンドを実施してからダウンロードしています。
sw1# access-defender erase ssl-files
Erasing SSL files in FLASH.......... Done.


sw1# copy tftp: https-certificate

Address of remote host []? 172.16.1.202
Source filename []? test.crt
Destination filename https-certificate? [y/n]:  y

% Importing certificate PEM file...
Reading file from tftp://172.16.1.202/test.crt
Loading test.crt from 172.16.1.202 (via Port1/0/49):!
[OK - 4474 bytes]


sw1# copy tftp: https-private-key

Address of remote host []? 172.16.1.202
Source filename []? test.key
Destination filename https-privatekey? [y/n]:  y

% Importing private key PEM file...
Reading file from tftp://172.16.1.202/test.key
Loading test.key from 172.16.1.202 (via Port1/0/49):!
[OK - 1679 bytes]


sw1#
- Web認証を有効にします。
sw1# configure terminal
sw1(config)# web-authentication enable
sw1(config)#
- 未認証クライアントに暫定的にIPアドレスを付与するための暫定DHCPサーバーを設定します。まずは、VLAN
4094インターフェースにIPアドレス[10.1.1.254/24]を設定します。
sw1(config)# interface vlan 4094
sw1(config-if-vlan)# ip address 10.1.1.254/24
sw1(config-if-vlan)# exit
sw1(config)#
- 暫定DHCPサーバー用のDHCPアドレスプール[temp-pool]を作成し、以下の内容で設定して有効にします。
サブネット[10.1.1.0/24]、デフォルトルーター[10.1.1.254]、リース期間[30秒]
sw1(config)# ip dhcp pool temp-pool
sw1(config-dhcp-pool)# network 10.1.1.0/24
sw1(config-dhcp-pool)# default-router 10.1.1.254
sw1(config-dhcp-pool)# lease 0 0 0 30
sw1(config-dhcp-pool)# exit
sw1(config)# service dhcp
sw1(config)# end
sw1#
- 実施後のAccessDefender関連の設定を以下に抜粋します。
# AAA

aaa new-model
radius-server host 172.16.1.101 key apresia
aaa authentication web-auth 1 default group radius

# ACCESS-DEFENDER

access-defender
 total-client 256
 logout aging-time 0 30 web

# WEB-AUTHENTICATION

access-defender
 authentication interface port 1/0/1-1/0/5 web
 web-authentication http-ip ipv4 192.0.2.100
 web-authentication redirect url https://192.0.2.100:443/www/AuthLogin.html
web-authentication enable
外部Webサーバーの認証ページにリダイレクトする場合
外部Webサーバーの認証ページにリダイレクトする場合の構成例と設定例を示します。この例では以下のように設定しています。
| 項目 | 設定 |
|---|---|
| RADIUS認証 | デフォルトのRADIUSサーバーグループ「radius」で使用 |
| RADIUSサーバー |
|
| 認証クライアントの最大数 | 256 |
| Web認証有効ポート | ポート1/0/1からポート1/0/5 |
| 自装置の認証用Webサーバー |
http://192.0.2.100:80/、またはhttps://192.0.2.100:443/ ※HTTPプロトコル(80)とHTTPSプロトコル(443)はデフォルト有効 |
| リダイレクト先URL | (外部Webサーバーの認証ページ)http://172.16.1.200/test.html |
| エージングログアウト時間 | 1時間 |
また、未認証クライアントが認証前に外部Webサーバーの認証ページを取得できるように、「外部Webサーバー宛ての通信をバイパス」する認証バイパスも設定しています。
外部Webサーバーの認証ページにリダイレクトする場合の構成例

- VLAN 10、VLAN 100を作成し、構成例のようにVLANを割り当てます。
sw1# configure terminal
sw1(config)# vlan 10,100
sw1(config-vlan)# exit
sw1(config)#
sw1(config)# interface range port 1/0/1-5
sw1(config-if-port-range)# switchport mode access
sw1(config-if-port-range)# switchport access vlan 10
sw1(config-if-port-range)# exit
sw1(config)#
sw1(config)# interface port 1/0/49
sw1(config-if-port)# switchport mode trunk
sw1(config-if-port)# switchport trunk allowed vlan 10,100
sw1(config-if-port)# exit
sw1(config)#
- VLAN 100インターフェースに管理用IPアドレス[192.168.100.100/24]を設定します。また、本設定例ではデフォルトスタティックルートを[192.168.100.254]宛てに設定して、経路を解決しています。
sw1(config)# interface vlan 100
sw1(config-if-vlan)# ip address 192.168.100.100/24
sw1(config-if-vlan)# exit
sw1(config)# ip route 0.0.0.0/0 192.168.100.254
sw1(config)#
- 装置のAAAを有効化します。また、Web認証で使用する認証方式リスト[ID:1]を、デフォルトのRADIUSサーバーグループ「radius」に指定します。
sw1(config)# aaa new-model
sw1(config)# aaa authentication web-auth 1 default group radius
sw1(config)#
- RADIUSサーバーを、IPアドレス[172.16.1.101]、共有鍵[apresia]で設定します。設定したRADIUSサーバーは、所属するRADIUSグループを指定しない場合はデフォルトのRADIUSサーバーグループ「radius」に所属します。
sw1(config)# radius-server host 172.16.1.101 key apresia
sw1(config)#
- AccessDefender設定モードに遷移し、認証クライアントの最大数を[256]に設定します。
sw1(config)# access-defender
sw1(config-a-def)# total-client 256
sw1(config-a-def)#
- ポート1/0/1からポート1/0/5でWeb認証を有効に、認証用WebサーバーのIPアドレスを[192.0.2.100]に設定します。装置の認証用Webサーバーでは、HTTPプロトコル(TCPポート番号80)とHTTPSプロトコル(TCPポート番号443)はデフォルト有効になっています。また、エージングログアウト時間を[1時間]に設定します。
sw1(config-a-def)# authentication interface port 1/0/1-5 web
sw1(config-a-def)# web-authentication http-ip ipv4 192.0.2.100
sw1(config-a-def)# logout aging-time 0 0 1 web
sw1(config-a-def)#
- リダイレクト先URLを、外部Webサーバーの認証ページ[http://172.16.1.200/test.html]に設定します。
sw1(config-a-def)# web-authentication redirect url http://172.16.1.200/test.html
sw1(config-a-def)# exit
sw1(config)#
- Web認証を有効にします。
sw1(config)# web-authentication enable
sw1(config)#
- 認証バイパス設定のために、標準IPアクセスリスト[IPv4-ACL]を作成し、以下のルールを設定します。
ルール10(authentication-bypass):宛先IPアドレス[172.16.1.200]
sw1(config)# ip access-list IPv4-ACL
sw1(config-ip-acl)# 10 permit authentication-bypass any host 172.16.1.200
sw1(config-ip-acl)# exit
sw1(config)#
- 設定したアクセスリストを認証ポート(ポート1/0/1からポート1/0/5)に適用します。
sw1(config)# interface range port 1/0/1-5
sw1(config-if-port-range)# ip access-group IPv4-ACL in

The remaining applicable IP related access entries are 255
sw1(config-if-port-range)# end
sw1#
- 実施後のAccessDefender関連の設定を以下に抜粋します。
# AAA

aaa new-model
radius-server host 172.16.1.101 key apresia
aaa authentication web-auth 1 default group radius

# ACCESS-DEFENDER

access-defender
 total-client 256
 logout aging-time 0 0 1 web

# WEB-AUTHENTICATION

access-defender
 authentication interface port 1/0/1-1/0/5 web
 web-authentication http-ip ipv4 192.0.2.100
 web-authentication redirect url http://172.16.1.200/test.html
web-authentication enable
- 実施後のアクセスリスト関連の設定を以下に抜粋します。
# ACL

ip access-list IPv4-ACL 1999
 10 permit authentication-bypass any host 172.16.1.200
interface port 1/0/1
 ip access-group IPv4-ACL in
interface port 1/0/2
 ip access-group IPv4-ACL in
interface port 1/0/3
 ip access-group IPv4-ACL in
interface port 1/0/4
 ip access-group IPv4-ACL in
interface port 1/0/5
 ip access-group IPv4-ACL in
個別Web認証ページを使用する場合
「Web認証の設定例」において、ポート1/0/3で以下を使用する場合の構成例と設定例を示します。
- 個別Web認証ページ
- Web認証のインターフェースごとの認証方式設定
個別Web認証ページは、NP2100の1.09.02以降、NP2000の1.09.01以降でサポートしています。
Web認証のインターフェースごとの認証方式設定は、NP2100の1.09.02以降、NP2000の1.09.01以降でサポートしています。
この例では以下のように設定しています。
| 項目 | 設定 |
|---|---|
| ポート1/0/3用 Web認証の認証方式設定 |
|
| ポート1/0/3用 個別Web認証ページ |
|
- 「Web認証の設定例」を実施します。
- RADIUSサーバーを、IPアドレス[172.16.1.102]、共有鍵[test-apresia]で設定します。
sw1# configure terminal
sw1(config)# radius-server host 172.16.1.102 key test-apresia
sw1(config)#
- RADIUSサーバーグループ「PORT-AUTH」を作成し、前の手順で設定したRADIUSサーバーを、このグループに所属するように設定します。
sw1(config)# aaa group server radius PORT-AUTH
sw1(config-sg-radius)# server 172.16.1.102
sw1(config-sg-radius)# exit
sw1(config)#
- ポート1/0/3のWeb認証で使用する認証方式リスト[ID:1]を、ユーザー設定のRADIUSサーバーグループ「PORT-AUTH」に指定します。
sw1(config)# aaa authentication web-auth 1 default group PORT-AUTH interface port 1/0/3
sw1(config)#
- ポート1/0/3で使用する個別Web認証ページ[ID:3]を設定します。
sw1(config-a-def)# web-authentication interface port 1/0/3 webpages 3
sw1(config-a-def)# end
sw1#
- 個別Web認証ページ[ID:3]で使用する以下の認証ページをTFTPサーバー[172.16.1.10]からダウンロードします。
ログイン認証ページ:test_login.html
認証成功ページ:test_login-success.html
認証失敗ページ:test_login-failure.html
sw1# copy tftp: webpages 3 login-page

Address of remote host []? 172.16.1.10
Source filename []? test_login.html
Destination filename 03-login-page? [y/n]:  y

 Accessing tftp://172.16.1.10/test_login.html...
 Transmission start...
 Transmission finished, file length 2427 bytes.
 Please wait, programming flash.............. Done.

sw1#

sw1# copy tftp: webpages 3 login-success-page

Address of remote host []? 172.16.1.10
Source filename []? test_login-success.html
Destination filename 03-login-success-page? [y/n]:  y

 Accessing tftp://172.16.1.10/test_login-success.html...
 Transmission start...
 Transmission finished, file length 1332 bytes.
 Please wait, programming flash.............. Done.

sw1#

sw1# copy tftp: webpages 3 login-failure-page

Address of remote host []? 172.16.1.10
Source filename []? test_login-failure.html
Destination filename 03-login-failure-page? [y/n]:  y

 Accessing tftp://172.16.1.10/test_login-failure.html...
 Transmission start...
 Transmission finished, file length 1011 bytes.
 Please wait, programming flash.............. Done.

sw1#
- 実施後のAccessDefender関連の設定を以下に抜粋します。
# AAA

aaa new-model
radius-server host 172.16.1.101 key apresia
radius-server host 172.16.1.102 key test-apresia
aaa group server radius PORT-AUTH
 server 172.16.1.102
aaa authentication web-auth 1 default group radius
aaa authentication web-auth 1 default group PORT-AUTH interface port 1/0/3

# ACCESS-DEFENDER

access-defender
 total-client 256
 logout aging-time 0 0 1 web

# WEB-AUTHENTICATION

access-defender
 authentication interface port 1/0/1-1/0/5 web
 web-authentication http-ip ipv4 192.0.2.100
 web-authentication redirect disable https
 web-authentication interface port 1/0/3 webpages 3
web-authentication enable
- 設定後の個別Web認証ページの情報を確認します。
sw1# show access-defender webpages

WEBPAGES-ID:3
Filename                        Size                 Date
---------------------------------------------------------
03-login-page                   2427 Nov 20 2020 16:02:18
03-login-success-page           1332 Nov 20 2020 16:03:26
03-login-failure-page           1011 Nov 20 2020 16:04:03
