スタックの構成例と設定例
スタックを利用する場合の構成例と設定例を示します。
リングトポロジー
以下のコマンドでスタック設定を実施する場合の例を示します。各装置を単体で起動した状態でスタック設定を実施します。
- stack bandwidthコマンドでスタックポートを指定してスタックを有効化
- stack my_box_idコマンドでボックスIDを設定
- stack my_box_priorityコマンドで優先度を設定
各装置でスタック設定を実施した後は、想定した装置がマスターになるように、すべてのメンバー装置を電源OFFした状態でスタックポートを接続し、同時に起動してスタックを構成します。
スタックの構成例(リングトポロジー)

マスターの設定例(sw1)
マスターの設定例(sw1)

- スタック機能を有効にします。
sw1# stack bandwidth 40G 2-port

 WARNING: The command does not take effect until the next reboot.
sw1#
- ボックスIDを[1]に設定します。
sw1# stack my_box_id 1

 WARNING: The command does not take effect until the next reboot.
sw1#
- 優先度を[10]に設定して保存します。スタックは装置を起動し直した後に有効になります。
sw1# stack my_box_priority 10
sw1# write memory

Destination filename startup-config? [y/n]:  y

Saving all configurations to NV-RAM.......... Done.

sw1#
- すべてのメンバー装置でスタック設定が完了したら、すべてのメンバー装置を電源OFFした状態でスタックポートを接続し、同時に起動してスタックを構成します。
バックアップマスターの設定例(sw2)
バックアップマスターの設定例(sw2)

- スタック機能を有効にします。
sw2# stack bandwidth 40G 2-port

 WARNING: The command does not take effect until the next reboot.
sw2#
- ボックスIDを[2]に設定します。
sw2# stack my_box_id 2

 WARNING: The command does not take effect until the next reboot.
sw2#
- 優先度を[32]に設定して保存します。スタックは装置を起動し直した後に有効になります。
sw2# stack my_box_priority 32
sw2# write memory

Destination filename startup-config? [y/n]:  y

Saving all configurations to NV-RAM.......... Done.

sw2#
- すべてのメンバー装置でスタック設定が完了したら、すべてのメンバー装置を電源OFFした状態でスタックポートを接続し、同時に起動してスタックを構成します。
スレーブの設定例(sw3)
スレーブの設定例(sw3)

- スタック機能を有効にします。
sw3# stack bandwidth 40G 2-port

 WARNING: The command does not take effect until the next reboot.
sw3#
- ボックスIDを[3]に設定します。
sw3# stack my_box_id 3

 WARNING: The command does not take effect until the next reboot.
sw3#
- 優先度を[60]に設定して保存します。スタックは装置を起動し直した後に有効になります。
sw3# stack my_box_priority 60
sw3# write memory

Destination filename startup-config? [y/n]:  y

Saving all configurations to NV-RAM.......... Done.

sw3#
- すべてのメンバー装置でスタック設定が完了したら、すべてのメンバー装置を電源OFFした状態でスタックポートを接続し、同時に起動してスタックを構成します。
リングトポロジー(stack renumber / stack priorityコマンド)
スタックのボックスIDと優先度はstack my_box_idコマンドおよびstack my_box_priorityコマンドで設定しますが、stack renumberコマンドおよびstack priorityコマンドでも設定できます。
以下のコマンドでスタック設定を実施する場合の例を示します。各装置を単体で起動した状態でスタック設定を実施します。
- stack bandwidthコマンドでスタックポートを指定してスタックを有効化
- stack renumberコマンドでボックスIDを設定
- stack priorityコマンドで優先度を設定
各装置でスタック設定を実施した後は、想定した装置がマスターになるように、すべてのメンバー装置を電源OFFした状態でスタックポートを接続し、同時に起動してスタックを構成します。
スタックの構成例(リングトポロジー)
マスターの設定例(sw1)
マスターの設定例(sw1)
- スタック機能を有効にします。
sw1# stack bandwidth 40G 2-port

 WARNING: The command does not take effect until the next reboot.
sw1#
- 設定前の装置のボックスIDはデフォルトの[1]とします。この装置ではボックスIDを[1]のまま使用するため、ボックスIDの変更は不要です。設定を保存し、装置を再起動します。再起動後にスタックが有効になります。
sw1# write memory

Destination filename startup-config? [y/n]:  y

Saving all configurations to NV-RAM.......... Done.

sw1# reboot

Are you sure you want to proceed with the system reboot?(y/n) y
Please wait, the switch is rebooting...
- ボックスID[1]の優先度を[10]に設定した後、設定を保存します。
sw1# stack 1 priority 10
sw1# write memory

Destination filename startup-config? [y/n]:  y

Saving all configurations to NV-RAM.......... Done.

sw1#
- すべてのメンバー装置でスタック設定が完了したら、すべてのメンバー装置を電源OFFした状態でスタックポートを接続し、同時に起動してスタックを構成します。
バックアップマスターの設定例(sw2)
バックアップマスターの設定例(sw2)
- スタック機能を有効にします。
sw2# stack bandwidth 40G 2-port

 WARNING: The command does not take effect until the next reboot.
sw2#
- 設定前の装置のボックスIDはデフォルトの[1]とします。ボックスIDを[2]に変更した後、設定を保存し、装置を再起動します。再起動後にスタックが有効になります。
sw2# stack 1 renumber 2

 WARNING: The command does not take effect until the next reboot.
sw2# write memory

Destination filename startup-config? [y/n]:  y

Saving all configurations to NV-RAM.......... Done.

sw2# reboot

Are you sure you want to proceed with the system reboot?(y/n) y
Please wait, the switch is rebooting...
- ボックスID[2]の優先度を[32]に設定した後、設定を保存します。
sw2# stack 2 priority 32
sw2# write memory

Destination filename startup-config? [y/n]:  y

Saving all configurations to NV-RAM.......... Done.

sw2#
- すべてのメンバー装置でスタック設定が完了したら、すべてのメンバー装置を電源OFFした状態でスタックポートを接続し、同時に起動してスタックを構成します。
スレーブの設定例(sw3)
スレーブの設定例(sw3)
- スタック機能を有効にします。
sw3# stack bandwidth 40G 2-port

 WARNING: The command does not take effect until the next reboot.
sw3#
- 設定前の装置のボックスIDはデフォルトの[1]とします。ボックスIDを[3]に変更した後、設定を保存し、装置を再起動します。再起動後にスタックが有効になります。
sw3# stack 1 renumber 3

 WARNING: The command does not take effect until the next reboot.
sw3# write memory

Destination filename startup-config? [y/n]:  y

Saving all configurations to NV-RAM.......... Done.

sw3# reboot

Are you sure you want to proceed with the system reboot?(y/n) y
Please wait, the switch is rebooting...
- ボックスID[3]の優先度を[60]に設定した後、設定を保存します。
sw3# stack 3 priority 60
sw3# write memory

Destination filename startup-config? [y/n]:  y

Saving all configurations to NV-RAM.......... Done.

sw3#
- すべてのメンバー装置でスタック設定が完了したら、すべてのメンバー装置を電源OFFした状態でスタックポートを接続し、同時に起動してスタックを構成します。
リングトポロジー(OSPF、ポートチャネル併用)
2台の装置でリングトポロジーのスタックを構成します。各装置でスタック設定を実施した後は、想定した装置がマスターになるように、すべてのメンバー装置を電源OFFした状態でスタックポートを接続し、同時に起動してスタックを構成します。スタックを構成した後は、マスターからスタック以外の設定を実施します。
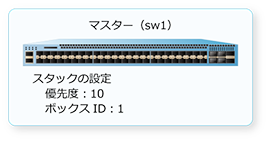
スタックの構成例(リングトポロジー+OSPF+ポートチャネル)

マスターの設定例(sw1)
マスターの設定例(sw1)
- スタック機能を有効にします。
sw1# stack bandwidth 40G 2-port

 WARNING: The command does not take effect until the next reboot.
sw1#
- ボックスIDを[1]に設定します。
sw1# stack my_box_id 1

 WARNING: The command does not take effect until the next reboot.
sw1#
- 優先度を[10]に設定して保存します。スタックは装置を起動し直した後に有効になります。
sw1# stack my_box_priority 10
sw1# write memory

Destination filename startup-config? [y/n]:  y

Saving all configurations to NV-RAM.......... Done.

sw1#
- すべてのメンバー装置でスタック設定が完了したら、すべてのメンバー装置を電源OFFした状態でスタックポートを接続し、同時に起動してスタックを構成します。
バックアップマスターの設定例(sw2)
バックアップマスターの設定例(sw2)

- スタック機能を有効にします。
sw2# stack bandwidth 40G 2-port

 WARNING: The command does not take effect until the next reboot.
sw2#
- ボックスIDを[2]に設定します。
sw2# stack my_box_id 2

 WARNING: The command does not take effect until the next reboot.
sw2#
- 優先度を[32]に設定して保存します。スタックは装置を起動し直した後に有効になります。
sw2# stack my_box_priority 32
sw2# write memory

Destination filename startup-config? [y/n]:  y

Saving all configurations to NV-RAM.......... Done.

sw2#
- すべてのメンバー装置でスタック設定が完了したら、すべてのメンバー装置を電源OFFした状態でスタックポートを接続し、同時に起動してスタックを構成します。
sw1のポートチャネルとOSPFの設定例
スタックを構成した後は、マスターからのみ設定できます。
sw1のポートチャネルとOSPFの設定例

- ポート1/0/1とポート2/0/1をチャネルグループに登録し、チャネルグループのIDを[1]に設定します。また、チャネルグループをLACPアクティブモードで動作させます。
sw1# configure terminal
sw1(config)# interface range port 1/0/1,2/0/1
sw1(config-if-port-range)# channel-group 1 mode active
sw1(config-if-port-range)# exit
sw1(config)#
- VLAN 1、VLAN 100、およびVLAN 200を作成します。
sw1(config)# vlan 1
sw1(config-vlan)# exit
sw1(config)# vlan 100
sw1(config-vlan)# exit
sw1(config)# vlan 200
sw1(config-vlan)# exit
sw1(config)#
- ポート1/0/3をトランクポートとして設定し、トランクポートに[VLAN 100]を割り当てます。また、ポート2/0/4をトランクポートとして設定し、トランクポートに[VLAN
200]を割り当てます。
sw1(config)# interface port 1/0/3
sw1(config-if-port)# switchport mode trunk
sw1(config-if-port)# switchport trunk allowed vlan 100
sw1(config-if-port)# exit
sw1(config)# interface port 2/0/4
sw1(config-if-port)# switchport mode trunk
sw1(config-if-port)# switchport trunk allowed vlan 200
sw1(config-if-port)# exit
sw1(config)#
- VLAN 1のIPアドレスを[192.168.100.254/24]に、VLAN 100のIPアドレスを[100.1.1.2/16]に、VLAN
200のIPアドレスを[200.1.1.2/16]に設定します。
sw1(config)# interface vlan 1
sw1(config-if-vlan)# ip address 192.168.100.254/24
sw1(config-if-vlan)# exit
sw1(config)# interface vlan 100
sw1(config-if-vlan)# ip address 100.1.1.2/16
sw1(config-if-vlan)# exit
sw1(config)# interface vlan 200
sw1(config-if-vlan)# ip address 200.1.1.2/16
sw1(config-if-vlan)# exit
sw1(config)#
- OSPFルーター設定モードに移行し、OSPFルーターIDを[100.1.1.2]に設定します。OSPFを有効にするネットワークを[100.1.0.0
0.0.255.255]および[200.1.0.0 0.0.255.255]に、それぞれのネットワークのエリアIDを[0]に設定します。また、直接接続された経路の再配布を設定します。
sw1(config)# router ospf
sw1(config-router)# router-id 100.1.1.2
sw1(config-router)# network 100.1.0.0 0.0.255.255 area 0
sw1(config-router)# network 200.1.0.0 0.0.255.255 area 0
sw1(config-router)# redistribute connected
sw1(config-router)# end
sw1#
sw3のポートチャネルの設定例
sw3のポートチャネルの設定例
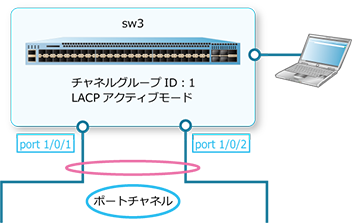
- ポート1/0/1とポート1/0/2をチャネルグループに登録し、チャネルグループのIDを[1]に設定します。また、チャネルグループをLACPアクティブモードで動作させます。
sw3# configure terminal
sw3(config)# interface range port 1/0/1,1/0/2
sw3(config-if-port-range)# channel-group 1 mode active
sw3(config-if-port-range)# end
sw3#
sw4のOSPFの設定例
sw4のOSPFの設定例
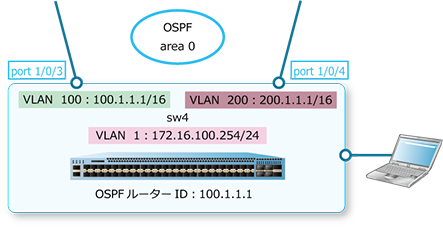
- VLAN 1、VLAN 100、およびVLAN 200を作成します。
sw4# configure terminal
sw4(config)# vlan 1
sw4(config-vlan)# exit
sw4(config)# vlan 100
sw4(config-vlan)# exit
sw4(config)# vlan 200
sw4(config-vlan)# exit
sw4(config)#
- ポート1/0/3をトランクポートとして設定し、トランクポートに[VLAN 100]を割り当てます。また、ポート1/0/4をトランクポートとして設定し、トランクポートに[VLAN
200]を割り当てます。
sw4(config)# interface port 1/0/3
sw4(config-if-port)# switchport mode trunk
sw4(config-if-port)# switchport trunk allowed vlan 100
sw4(config-if-port)# exit
sw4(config)# interface port 1/0/4
sw4(config-if-port)# switchport mode trunk
sw4(config-if-port)# switchport trunk allowed vlan 200
sw4(config-if-port)# exit
sw4(config)#
- VLAN 1のIPアドレスを[172.16.100.254/24]に、VLAN 100のIPアドレスを[100.1.1.1/16]に、VLAN
200のIPアドレスを[200.1.1.1/16]に設定します。
sw4(config)# interface vlan 1
sw4(config-if-vlan)# ip address 172.16.100.254/24
sw4(config-if-vlan)# exit
sw4(config)# interface vlan 100
sw4(config-if-vlan)# ip address 100.1.1.1/16
sw4(config-if-vlan)# exit
sw4(config)# interface vlan 200
sw4(config-if-vlan)# ip address 200.1.1.1/16
sw4(config-if-vlan)# exit
sw4(config)#
- OSPFルーター設定モードに移行し、OSPFルーターIDを[100.1.1.1]に設定します。OSPFを有効にするネットワークを[100.1.0.0
0.0.255.255]および[200.1.0.0 0.0.255.255]に、それぞれのネットワークのエリアIDを[0]に設定します。また、直接接続された経路の再配布を設定します。
sw4 configure terminal
sw4(config)# router ospf
sw4(config-router)# router-id 100.1.1.1
sw4(config-router)# network 100.1.0.0 0.0.255.255 area 0
sw4(config-router)# network 200.1.0.0 0.0.255.255 area 0
sw4(config-router)# redistribute connected
sw4(config-router)# end
sw4#
2台限定のチェーントポロジー
stack bandwidthコマンドのchainオプションを使用して、2台限定のチェーントポロジーでスタックを構成します。各装置でスタック設定を実施した後は、想定した装置がマスターになるように、すべてのメンバー装置を電源OFFした状態でスタックポートを接続し、同時に起動してスタックを構成します。
スタックの構成例(2台限定のチェーントポロジー)
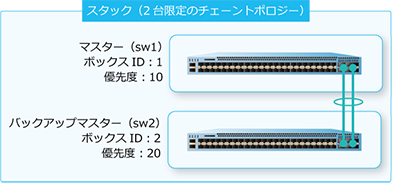
マスターの設定例(sw1)
マスターの設定例(sw1)

- chainオプションを使用してスタック機能を有効にします。
sw1# stack bandwidth 40G 2-port chain

 WARNING: The command does not take effect until the next reboot.
sw1#
- ボックスIDを[1]に設定します。
sw1# stack my_box_id 1

 WARNING: The command does not take effect until the next reboot.
sw1#
- 優先度を[10]に設定して保存します。スタックは装置を起動し直した後に有効になります。
sw1# stack my_box_priority 10
sw1# write memory

Destination filename startup-config? [y/n]:  y

Saving all configurations to NV-RAM.......... Done.

sw1#
- すべてのメンバー装置でスタック設定が完了したら、すべてのメンバー装置を電源OFFした状態でスタックポートを接続し、同時に起動してスタックを構成します。
バックアップマスターの設定例(sw2)
バックアップマスターの設定例(sw2)

- chainオプションを使用してスタック機能を有効にします。
sw2# stack bandwidth 40G 2-port chain

 WARNING: The command does not take effect until the next reboot.
sw2#
- ボックスIDを[2]に設定します。
sw2# stack my_box_id 2

 WARNING: The command does not take effect until the next reboot.
sw2#
- 優先度を[20]に設定して保存します。スタックは装置を起動し直した後に有効になります。
sw2# stack my_box_priority 20
sw2# write memory

Destination filename startup-config? [y/n]:  y

Saving all configurations to NV-RAM.......... Done.

sw2#
- すべてのメンバー装置でスタック設定が完了したら、すべてのメンバー装置を電源OFFした状態でスタックポートを接続し、同時に起動してスタックを構成します。
